Artificial Intelligence (AI) workloads are fundamentally built on matrix operations. Whether it’s deep learning inference or training, the Matrix Multiply Unit (MMU) is the heart of any AI accelerator. Designing this unit efficiently can make or break your accelerator’s performance and power profile.
In this article, we’ll dive deep into the architecture of the MMU, explore pipelining strategies for high throughput, and discuss verification techniques that ensure correctness and robustness.
Why Is the Matrix Multiply Unit So Critical?
Matrix multiplication is the backbone of neural networks. Every convolution, every fully connected layer, and even attention mechanisms in transformers rely on fast, efficient matrix operations. The MMU is responsible for executing these operations at scale, often processing millions of multiplications and additions per second.
Matrix multiplication is computationally expensive. For an operation like:
C = A × B
where A is an m × k matrix and B is a k × n matrix, the complexity is O(m ⋅ k ⋅ n). For large neural networks, these dimensions can easily reach thousands, making efficient hardware essential.
The MMU accelerates this by:
- Exploiting parallelism (compute multiple products simultaneously).
- Reducing data movement (reuse weights and activations locally).
- Supporting low-precision arithmetic (INT8, FP16) for speed and energy efficiency.
A well-designed MMU can:
- Accelerate AI workloads by orders of magnitude compared to general-purpose CPUs.
- Reduce power consumption by minimizing unnecessary data movement.
- Enable real-time AI on edge devices, from smartphones to autonomous vehicles.
Key Design Considerations
Designing an MMU isn’t just about raw speed. It’s about balancing performance, area, power, and flexibility. Here are the core aspects to consider:
1. Parallelism and Dataflow
- Systolic Arrays: Popular in modern AI accelerators (like Google’s TPU), systolic arrays allow for massive parallelism by passing data rhythmically through a grid of processing elements (PEs), minimizing memory access.
- SIMD Architectures: Single Instruction, Multiple Data (SIMD) units can process multiple data points with a single instruction (multiple MAC units operate under a single instruction stream), ideal for vectorized matrix operations.
- Tiling and Blocking: Breaking large matrices into smaller tiles optimizes memory usage and data reuse, reducing costly memory accesses.
- Sparse Compute Units: Skip zero weights for efficiency.
2. Precision and Data Types
- Fixed-Point vs. Floating-Point: Many AI workloads tolerate reduced precision (e.g., INT8 or FP16), which can dramatically increase throughput and reduce power.
- INT8: Best for inference; reduces memory and power.
- FP16/BF16: Common for training; balances accuracy and efficiency.
- Mixed Precision: Combine INT8 for activations and FP16 for weights.
- Configurable Precision: Some MMUs support multiple data types, allowing dynamic trade-offs between accuracy and efficiency.
3. Memory Hierarchy and Data Locality
- On-Chip Buffers: Storing input, weight, and partial result tiles close to the compute units minimizes latency.
- Efficient Data Paths: Direct, high-bandwidth connections between buffers and the MMU are essential for sustained throughput.
4. Scalability and Modularity
- Scalable Arrays: Design the MMU as a modular block that can be replicated for larger accelerators.
- Flexible Interfaces: Support for various input/output data widths and protocols ensures integration with different system architectures.
Step-by-Step Design Flow
Let’s break down a typical MMU design process:
- Define Requirements:
- Target matrix sizes, data types, throughput, and power constraints.
- Choose Architecture:
- Systolic array, SIMD, or custom datapath based on workload analysis.
- Design Processing Elements (PEs):
- Each PE performs multiply-accumulate (MAC) operations. Optimize for area and power.
- Implement Dataflow:
- Design the interconnects and control logic for data movement between PEs and buffers.
- Integrate Buffers:
- Place input, weight, and output buffers strategically to maximize data reuse.
- Optimize and Iterate:
- Profile performance, identify bottlenecks, and refine the architecture.
Core Architecture of a Matrix Multiply Unit
A typical MMU consists of:
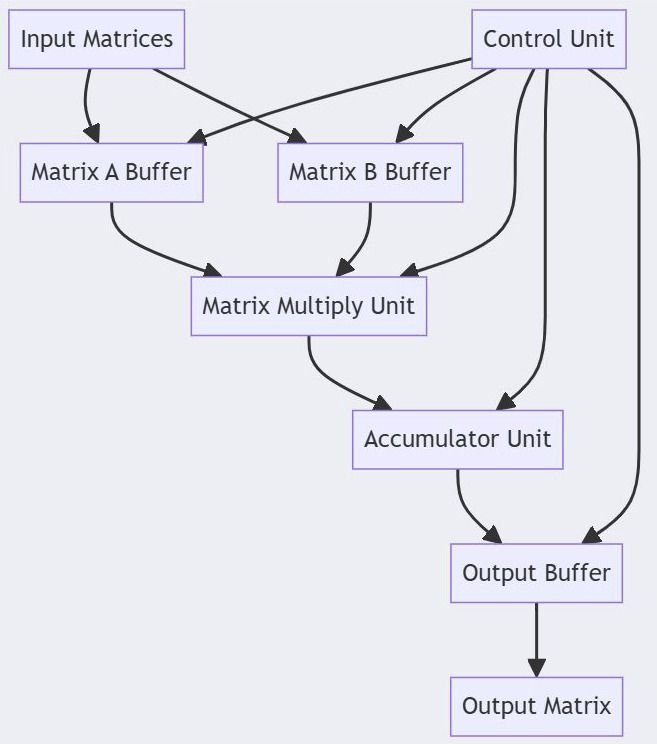
- Processing Elements (PEs)
- Each PE performs a multiply-accumulate (MAC) operation.
- Organized in arrays (e.g., systolic arrays) for parallel computation.
- Input and Weight Buffers
- Feed data into PEs without stalling.
- Often double-buffered for continuous streaming.
- Accumulator Registers
- Store partial sums before final output.
- Interconnect Fabric
- Enables efficient data movement between PEs.
Pipelining for High Throughput
Pipelining is the secret sauce for performance. Here’s how it works:
- Stage 1: Load Inputs and Weights
- Fetch data from buffers into PEs.
- Stage 2: Multiply
- Perform multiplication in parallel across PEs.
- Stage 3: Accumulate
- Add products to partial sums.
- Stage 4: Write Back
- Store results in output buffer.
By overlapping these stages, you ensure that while one batch is being multiplied, the next batch is being loaded – maximizing utilization. Use deep pipelines for large arrays but balance against latency and power.
Verification: Ensuring Correctness and Robustness
A high-performance MMU is only valuable if it’s reliable. Verification is critical to catch bugs early and ensure the unit behaves as expected under all conditions.
- Functional Verification
- Testbenches: Develop comprehensive testbenches that cover all possible input scenarios, including edge cases (e.g., zero matrices, max/min values, overflow scenarios).
- Golden Reference Models: Compare MMU outputs against a trusted software model (e.g., NumPy or MATLAB).
- Randomized Testing:
- Use random input patterns to uncover corner-case bugs.
- Randomize matrix sizes, data patterns, and precision modes.
- Apply constrained random stimulus for coverage.
- Formal Verification
- Property Checking: Specify and prove properties such as “output = A × B for all valid inputs.”
- Prove properties like “no deadlock” and “correct accumulation order”.
- Equivalence Checking: Ensure that design optimizations don’t alter functional correctness.
- Performance and Power Validation
- Cycle-Accurate Simulation: Measure latency, throughput, and resource utilization.
- Power Analysis: Use tools to estimate dynamic and static power consumption under real workloads.
- Run real AI workloads (e.g., ResNet, BERT) to measure throughput and energy.
- Timing and Pipelining Checks
- Ensure pipeline stages don’t introduce hazards.
- Use SystemVerilog Assertions (SVA) for ready/valid handshakes.
- Hardware-in-the-Loop (HIL) Testing
- FPGA Prototyping: Deploy the MMU on an FPGA to validate real-world performance and integration with other accelerator modules.
Best Practices
- Start Simple: Begin with a basic MMU, verify correctness, then incrementally add optimizations.
- Reuse Data Aggressively: Minimize DRAM access.
- Clock Gating: Disable idle PEs to save power.
- Modular Design: Keep MMU separate from control logic for scalability.
- DFT Hooks: Add scan chains for easy testing.
- Automate Testing: Use continuous integration (CI) pipelines to run regression tests on every design change.
- Profile Early: Use synthetic and real AI workloads to profile performance and guide optimizations.
- Collaborate: Work closely with software teams to ensure the MMU meets the needs of AI frameworks and models.
The Matrix Multiply Unit is the engine that powers modern AI accelerators. By carefully balancing parallelism, precision, and dataflow, and by rigorously verifying every aspect of the design, you can build MMUs that deliver both performance and reliability. Whether you’re a hardware designer, verification engineer, or AI researcher, mastering the MMU is a foundational skill for the next generation of intelligent systems.
Ready to build the basic yet the most important block of an AI accelerator hardware – A 2×2 MMU?
Discover more from VLSIFacts
Subscribe to get the latest posts sent to your email.